If you are a fellow old house owner dear reader, then you well know to expect the unexpected, or have learned to not be surprised. This past year was, not surprisingly, full of such lessons…so we rolled up our paint stripping tattered sleeves and got to work. What follows in a brief accounting of all of the repair detours we made or identified for next year.
Remember the beautiful job Mike Dube Plastering and Stucco did restoring our kitchen ceiling in Plaster On, Plaster Off? Well our shower and tub had different plans. What at first appeared to be plausible light staining bleeding through the new finish plaster, was confirmed as a leak weeks later as I stood in the shower one morning and observed drips of water wicking into the tile grout joints. After that disconcerting discovery, I opened up the plumbing access panel to find a moist first floor plaster ceiling with water also leaking from the shower valves.
All those stains and some fresh spalling too. Sorry Mike!
Luckily we have a second full bathroom in the basement thanks to the Stadtmuellers (the second owners of the house…we’re the fourth owners). We shut off the water to the upstairs and Kit’s dad…who had already given me a tutorial in sweating copper pipe earlier for a small leak in the basement (so many leaks for one year!)…and I removed a section of the original brass cold and hot water pipes and installed new copper pipe with shut-off valves to the shower stems. Let me take a moment to emphasize the quality of the original plumbing…the threaded Anaconda 67 brass pipe (yes the whole house top-to-bottom is brass) had 3/32″ thick walls and was still clear and clean of any debris or scale after 87 years of use. The copper pipe and brass fittings we installed were the highest quality I could buy, but seemed wimpy and insufficient when compared to the superiority of the original work. Having successfully installed the shut off valves we could now still use the toilet and sink in the upstairs bathroom and began to figure out our next steps to restoring the tub and shower.
One of the most common features on of 1920s and 1930s era homes…and one that I love…are 4-1/4″ x 4-1/4″ square tile bathrooms, typically found in pastel colors. Our house has a very sharp lilac tile with jet black tile trim. However, if you have ever been faced with the need to regrout these tiles, then you know full well how futile this task can appear to be, as the joints can be so small as if the tiles were just butted against on another. I had originally intended to do the work myself, but Kit wisely pointed out the laundry list of work we still had yet to complete for the year, so we hired a local tile contractor who does a lot of regrouting work. They removed much of the deteriorated grout by hand with a utility blade, and gingerly removed and reset about a dozen loose tiles, before thoroughly cleaning the tile and applying the new grout. The end product looks pretty good…just don’t look at the joints too closely as in spots they vary in width due to minor chipping of the tile edges from the grout taking something with it when it was removed.
The second part of this saga involved rebuilding all of the original shower valves. Kit when to town cleaning the valve stems, revealing their gleaming bronze composition. We bought new rubber washers and packing for the stems and new brass seats for the valve bodies. Removing the original brass seats caused several new grey hairs to grow from my head as after removing the first one with ease the final three almost did not come out. In the end what worked best was not a bit extractor, but the simple seat removal tool and some liquid wrench soaked overnight…this combined with some hearty smacks with a mallet to make sure the tool was set deep into the brass of the valve seat . Did I also mention that we discovered a crack in one of the valve-bodies? Lets just say that a careful and pain staking use of J B Weld metal epoxy successfully mended the crack…which thankfully was rather small and only at the threaded front edge. Everything finally went back together and works great..we just need to get around to finding some slightly longer threaded brass pipe to securely reattach two of the original porcelain escutcheons (the resetting of the loose tile caused the original threaded pieces to just be a tad too short).
After last winter’s ice dam damage we reassessed our priorities and chose to insulate the roofs of MPLMP. This summer, literally two days before the painters arrived, the insulation went in. We decided to insulate the attic floor with a unique material called AirKrete for a few reasons…
- We didn’t want to tangle with cutting in soffit vents and a ridge vent to allow us to put batt insulation or foam board in-between the roof rafters.
- We wanted to make sure that we able to get our 20% homeowner rehabilitation tax credit on the work we did, so a product that would adhere to the substrate…such as closed cell spray foam was out of the question…plus by NYS code you are required to provide a 30 minute fire separation (5/8″ Type X drywall, or 1/2″ t&g wood) over any exposed spray foam in storage areas.
- When we pulled up several attic floor boards for installation of our new bathroom vent fan (it looks like and is a recessed led light that also is a fan, check it out!) we discovered that our attic floor is framed using only 2x6s on 16 inch centers. For those of you who know your structural load tables, you will certainly notice that this is undersized for the 13 foot span this floor makes. All that aside, with our crazy thick plaster (we’re talking 3/4″ to 1″ deep keying beyond the heavy-duty metal lath) we were left with about 5″ of space to fill with insulation.
- Five inches of dense pack cellulose (the normal approach for this application…and about 2x cheaper I might add) would only get us an effective R-21 for the second floor ceiling assembly, which is nowhere near the R-39 modern code would require.
- Airkrete is basically a very light concrete. It is very mold and pest resistant, essentially fireproof, and most importantly would get us an effective R-33 for the second floor ceiling assembly which is much better.
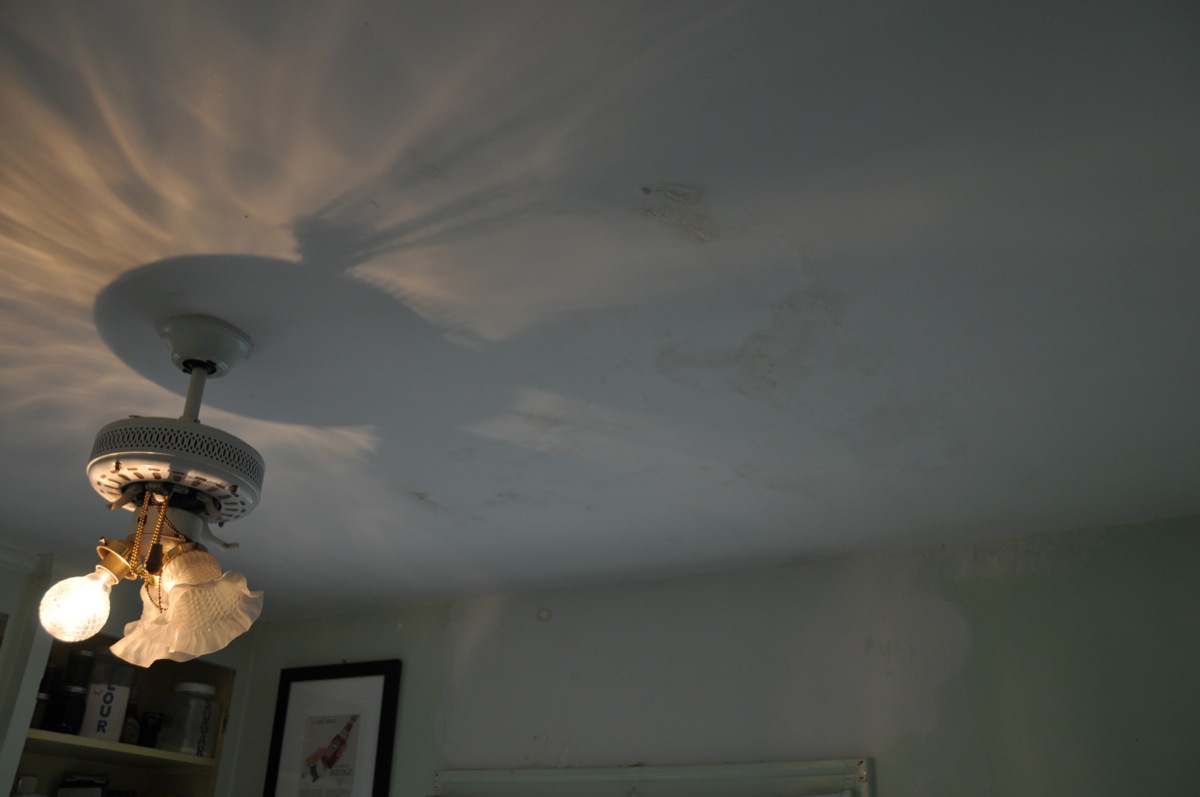
In the end it was very successful as our attic is now ice-cold with little evidence of heat loss through the floor. An unfortunate side effect, of the “wet” application process of the Aikrete is that what little vapor from curing went through the plaster ceiling instead of the attic floor boards caused the old poorly applied paint to dis-adhere and has now begun to rain down on us in the master bedroom and to our dismay has bubbled the ceilings in the two other bedrooms which we freshly painted before our housemates moved in. Sooo guess what we’ll be doing this spring?
The final major crossing of eyes, has to do with our steam boiler. Our house has a Utica Boiler which was made right here in New York in 1991. It is still in pretty good shape, however it burns the same amount of gas to heat our home as our parents burn with their 60 year old boiler to heat their home…which is twice the size. Any guesses how this might be? Well I’ve done some reading in of the priceless books written by Dan Holohan, Greening Steam and The Lost Art of Steam Heating as well as fielded questions to experts on the “Strictly Steam” section of “The Wall” forum on Dan’s equally amazing website http://www.heatinghelp.com. The conclusion?

The boiler in question…also check out the period asbestos pipe insulation!
For starters I am at a disadvantage because the boiler itself is a poor design with its side-taps for the steam mains. Second the steam mains that feed the radiators are not properly vented…nor are the radiators which causes excess back pressure from the trapped air which shuts off the boiler prematurely. Third, and most importantly, whoever installed the boiler in 1991…I’m looking at you Isaac Heating and Cooling…decided to forego any standards of practice for design of the near boiler piping and disregarded even the clearly labeled piping diagram in the installation manual to essentially make up their own solution for connecting the boiler to the old steam mains. There is no drop header. The branches to the main are 1″ copper instead of the required 2-1/2″ iron pipe…just to make absolutely certain that the steam is as wet, heavy and inefficient as can be when it attempts to travel through the mains to the radiators. There is no clean-out for skimming and servicing of the boiler, thus decreasing the longevity of the unit…nor are there any shut-offs to the mains to blow down the boiler. I guess the only way they could have made it worse would be to have vented the exhaust duct right into the house to fill it with carbon monoxide. Did I mention that they neglected to take CO readings during last year’s “annual tune-up” and so did not notice that the exhaust air going up the flue was at an alarmingly dangerous 800+ parts per million? We cannot wait until to enact as many corrective measures and improvements to make our steam system efficient and balanced again this coming summer. Hopefully then we will really see some significant savings.
Up next…progress on the kitchen and some “frivolous” finishing touches that make me happy!

Pingback: Rehabbing the Radiators | My Perfect Little Money Pit
Hi,
Can you please let me know if you’ve had any problems with the Airkrete insulation? I have read that it’s fragile and crumbly.
I’m planning to use Airkrete and would appreciate any information you could provide.
Thank you.
Oh wow. Your bathroom is identical to the one in the apartment we just left. I had never seen that colour of tile before in my life! It won’t be as relevant now that we’ve left, but do you know if that was very common? A colour trend like how in the 60s and 70s people wanted celery green shag carpet? I have a real question on another of your posts, but I was too stunned by this twin bathroom to not say something!
As best as I can tell, the lilac tile was not very common. The more common colors I have seen in late 1920s bathrooms are white, baby blue, light pink, and sea-foam green. Our tiles were made by the American Encaustic Tile Company (AETCO).
The most common bathroom tile colors in our area that I am ware of from the late 1920s were white, seafoam green, pink, an light blue. Our lilac tile with jet black trim is pretty avant gard for conservative Rochester.